Wrapping with tissue paper: Wrap your gifts in style
Wrapping a gift with tissue paper seems simple, but did you know that a whopping 63 percent of people admit to having trouble neatly wrapping gifts ? Surprising, right? Yet, the first step isn't choosing the prettiest paper, but rather setting up an organized workspace and cleverly gathering your materials. This makes even the most modest gift look like an exclusive present.
Table of contents
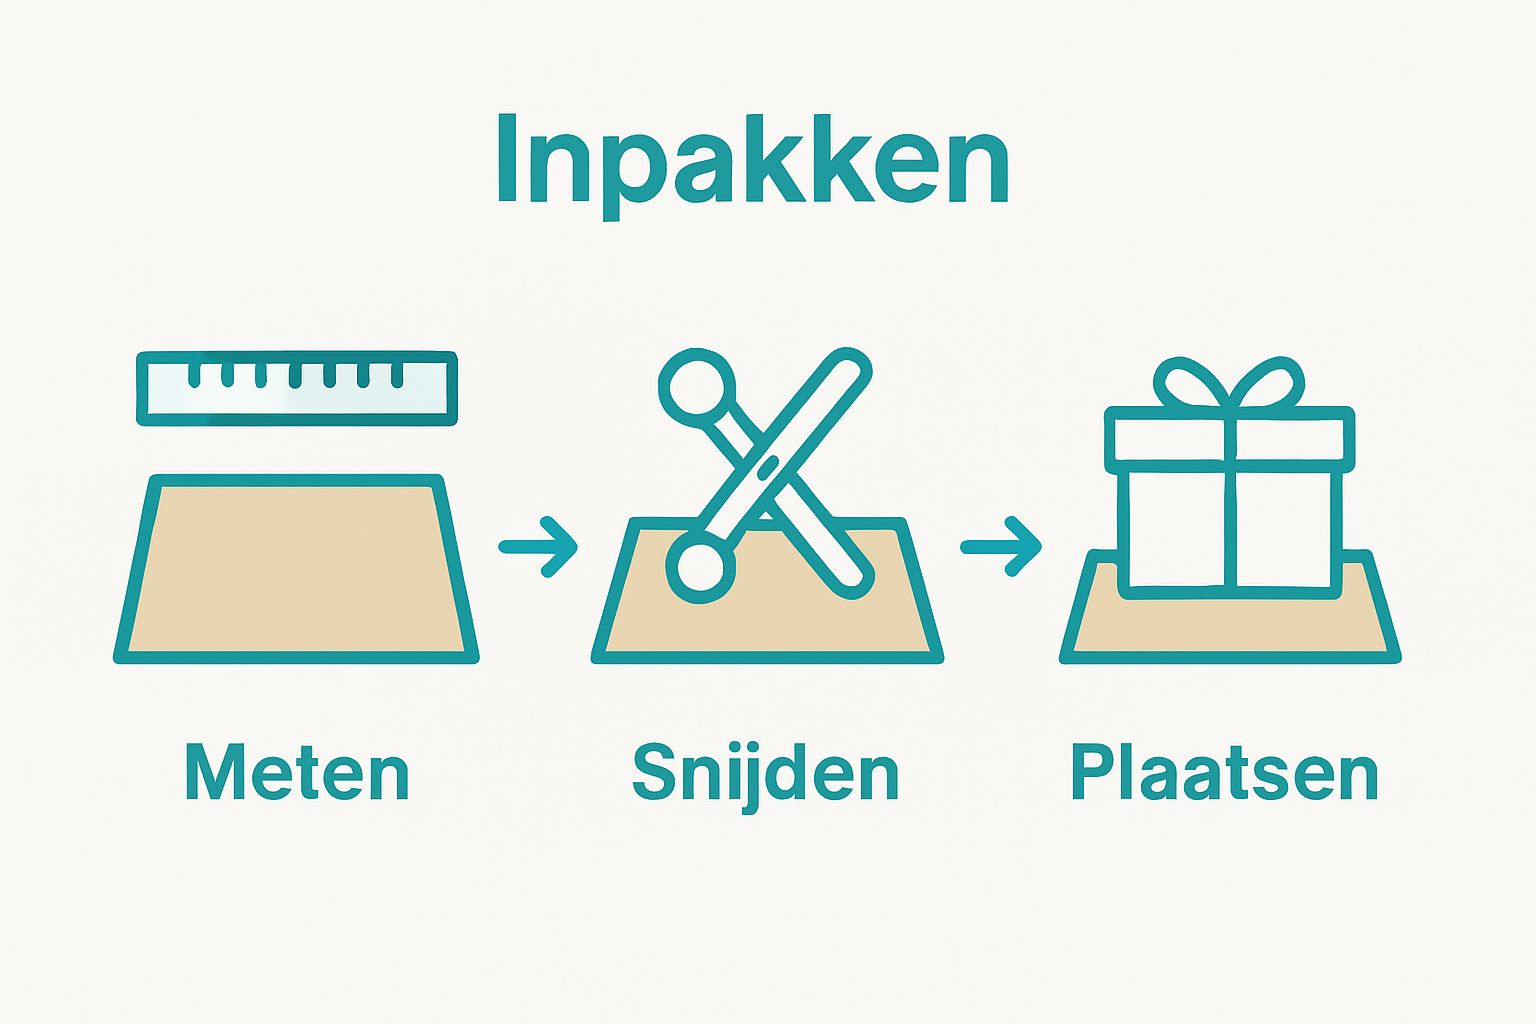
- Step 1: Gather all necessary materials for packing
- Step 2: Measure and cut the tissue paper to the desired size
- Step 3: Place the tissue paper on the surface and prepare the gift
- Step 4: Carefully wrap the gift in the tissue paper
- Step 5: Secure the tissue paper with tape or ribbon
- Step 6: Check the packaging and add a card if necessary
Short Summary
| Important Point | Explanation |
|---|---|
| 1. Gather essential materials | Provide tissue paper, scissors, tape, and decorations. This will make packing easier and prevent mess. |
| 2. Measure and cut accurately | Allow 5 cm extra space on each side of the gift. This ensures a neat finish without any folds that are too tight or too loose. |
| 3. Position the gift strategically | Place the gift in the center of the paper with even margins. This creates a professional look during wrapping. |
| 4. Secure with tape or ribbon | Use clear tape for invisible attachment. A pretty ribbon adds decoration and enhances the presentation. |
| 5. Add a personal card | A handwritten card increases the emotional value of the gift and makes it more personal. |
Step 1: Gather all necessary materials for packing
Gathering the right materials is the crucial first step in stylishly wrapping your gifts with tissue paper. A well-prepared workspace ensures a smooth and organized wrapping process. Before you begin, it's important to have all the supplies you need on hand.
Essential materials for packing
Start by gathering the core materials you'll need for professional gift wrapping. Make sure you have the following items ready: tissue paper in your desired colors and patterns, sharp scissors, a sturdy work surface, masking tape or masking tape, and any decorative elements like ribbons or bows. Our guide to basic gift wrapping materials can help you select the right materials.
The quality of your tissue paper is crucial. Choose sturdy but flexible paper that doesn't tear or wrinkle. Pay attention to the thickness and texture of the paper—paper that's too thin tears easily, while paper that's too thick is difficult to fold. Also, make sure you have enough material to completely cover your gift, with a small margin for potential errors.
Preparing your workspace
Create a spacious, clean work surface where you can work undisturbed. Spread out a large piece of cardboard or old newspaper to protect your table and ensure you can easily slide and fold. Ensure adequate lighting so you can work accurately and see all the details clearly.
Keep all materials organized and within reach. A small drawer or container can be helpful for keeping small accessories like tape, scissors, and decorative elements together.
Below you will find an overview of the essential materials mentioned in the article, including their purpose and any tips for use.
| Material | Goal | Tip for Use |
|---|---|---|
| Tissue paper | Wrapping the gift | Use sturdy, flexible and wrinkle-free paper |
| Pair of scissors | Precise cutting of paper | Make sure the scissors are sharp for straight cuts |
| adhesive tape | Fixing the tissue paper | Use transparent or double-sided tape for a neat result |
| Ribbon/bow | Decorative finish | Choose a ribbon that contrasts or harmonizes |
| Cardboard/newspaper | Protecting the work table | Place on a table for a clean, sturdy work surface |
| Drawer/tray | Organizing small accessories | Keep tape, scissors, and decorations within reach |
Step 2: Measure and cut the tissue paper to the desired size
After gathering your materials, accurately measuring and cutting the tissue paper is a crucial step in creating professional-looking gift wrapping. Correct measurements ensure your gift is wrapped neatly and securely, without excess wrinkles or unsightly edges.
Accurately measuring your tissue paper
Start by carefully spreading out your tissue paper on a flat surface. Place your gift in the center, making sure there's plenty of room around all sides. As a rule of thumb, you should leave about 2 inches (5 centimeters) of extra space on each side of your gift. This gives you enough room to fold neatly without the paper being too tight or too loose. Learn more about perfect gift wrapping for additional tips and tricks.
Use sharp scissors and a ruler or tape measure to make a straight, accurate cut. Some professionals even use a cutting mat with grid lines for extra precision. Lift your gift to check the paper alignment before making the final cut. Be especially careful not to tear or fray the tissue paper during cutting.
Dealing with different types of gifts
Each gift shape requires a slightly different approach to measuring and cutting. Rectangular boxes are relatively easy, but round or irregular shapes require more attention. Loosely wrap the paper around your gift and carefully mark where to cut. Consider the thickness of the gift and ensure there's enough overlap for a neat fold.
A helpful tip is to first make a test cut on a strip of paper you won't be using. This way, you can test the precise cutting angle and length without damaging your main tissue paper. After cutting, check that the paper fits symmetrically and snugly around the gift without any bumps or wrinkles.
Step 3: Place the tissue paper on the surface and prepare the gift
After accurately measuring and cutting your tissue paper, the crucial phase of positioning and preparation begins. This step determines the final elegance of your gift wrapping and requires precision and patience.
Preparing the ideal surface
Spread your tissue paper out evenly and tightly on a clean, sturdy work surface. Ensure there are no folds or creases that could interfere with the finishing. The surface should be large enough to easily wrap your gift, with plenty of room on all sides. Learn more about the art of wrapping with tissue paper for advanced techniques.
Before you begin, check that your gift is perfectly prepared. Remove any price tags or stickers, and ensure the packaging or box doesn't have any protruding edges that could hinder the wrapping process. If you're wrapping an irregular or fragile item, consider using a sturdy box or gift wrap as a base.
Strategic positioning of your gift
Place your gift precisely in the center of the tissue paper, leaving an even margin on all sides. Positioning is crucial: too close to the edge and you won't have enough material to fold neatly; too far in the center and you'll waste precious tissue paper. Carefully lift your gift and check that the backing remains smooth and taut.
Consider the thickness of your gift. Very small or large items require a different approach. Small gifts can use some additional folding techniques for a refined look, while large gifts require more material and precision. Take a moment to find the best position before you finally start folding and gluing.
This overview provides the most important packing steps with a brief description and the desired result, so you can easily follow the entire process.
| Step | Short Description | Desired Result |
|---|---|---|
| Collecting materials | Prepare all necessary materials | Well prepared start to the process |
| Measure and cut tissue paper | Measure the gift generously and cut the paper neatly and precisely. | Tight, even base |
| Positioning on the surface | Smooth paper on work surface, place gift in center | Effective, symmetrical starting position |
| Wrap carefully | Systematic folding of paper around a gift | Neatly wrapped gift, tight and wrinkle-free |
| Fasten with tape or ribbon | Secure folds invisibly or finish with beautiful ribbon | Professional, neat finish |
| Final check & add card | Check for tightness and add a personal touch | Personal and neat gift packaging |
Step 4: Carefully wrap the gift in the tissue paper
Carefully wrapping your gift is the moment where your technical preparation meets artistic execution. This phase determines the final presentation of your gift and requires precision, patience, and a calm approach.
Technique of neat wrapping
Start by gently lifting the bottom edge of your tissue paper and bringing it tightly over the first side of your gift. Make sure the fold is smooth and crisp, with no wrinkles or bumps. Use your fingers to make sharp, straight creases along the edges of your gift. The key is to apply constant, even pressure without tearing the paper. Learn more about the different ways to use tissue paper for additional inspiration and techniques.
For rectangular boxes, the process is fairly straightforward. Work systematically from one side to the other, neatly folding the edges in half each time. Pay special attention to the corners—they determine whether your packaging looks neat or sloppy. Use small, discreet pieces of tape to hold the folds in place without being visible.
Dealing with challenging shapes
Irregular or curved objects require more creativity. Approach these gifts with extra patience and consider whether multiple layers of tissue paper are necessary to achieve a smooth finish. Some items are best wrapped in a layer of tissue paper before applying the final decorative layer.
After wrapping, it's important to critically examine your work. Check that all edges are neatly finished, there are no loose ends sticking out, and that the paper fits tightly around the gift. A perfectly wrapped gift feels like a work of art that the recipient will enjoy unwrapping.
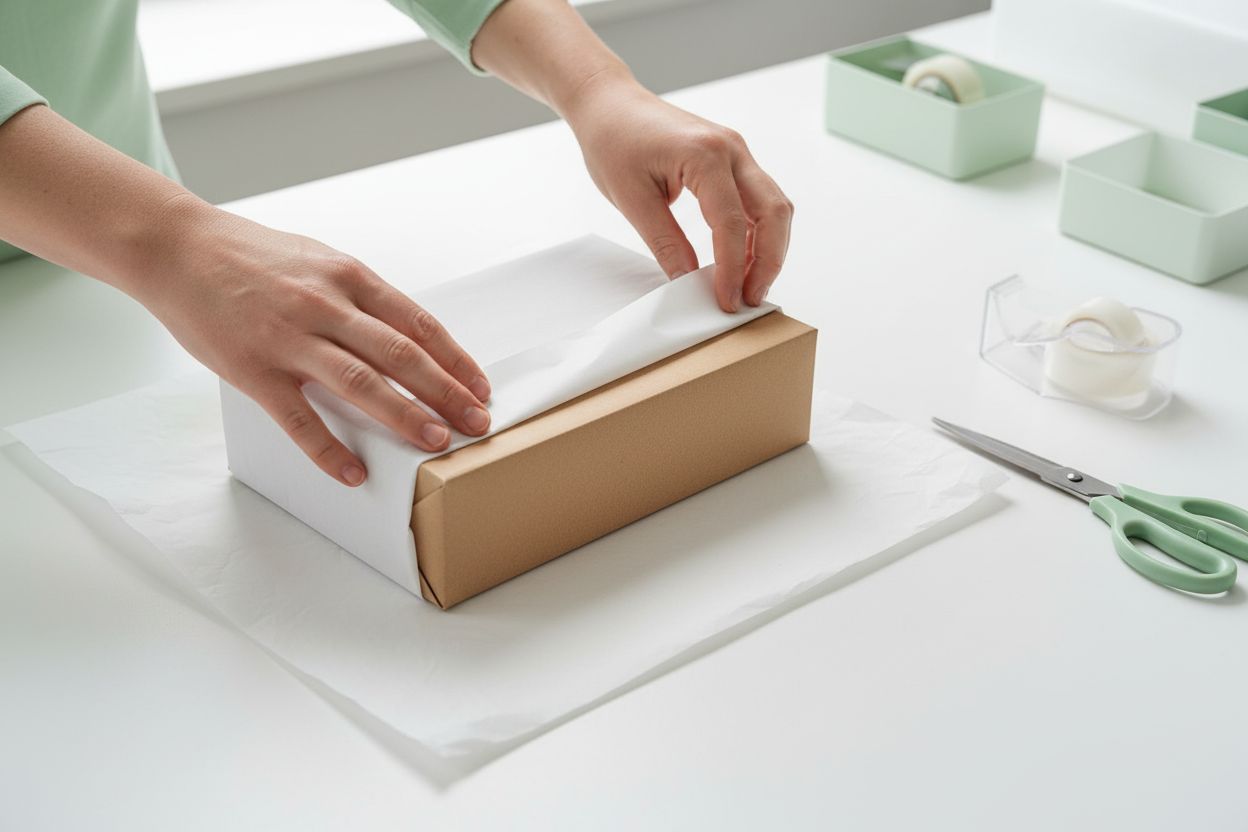
Step 5: Secure the tissue paper with tape or ribbon
After carefully wrapping your gift, securing the tissue paper is the crucial finishing touch that determines how professional and polished your gift will look. A good securing technique prevents loose edges and ensures a clean, neat finish.
Choosing the right mounting method
Invisible fastening is the goal when wrapping with tissue paper. Use clear tape or double-sided tape to secure the folds without unsightly sticky edges. Cut small, narrow pieces of tape to fit the fold lines of your tissue paper. Press the tape firmly with your fingertips to create smooth, nearly invisible seams. Learn more about different wrapping materials for advanced techniques.
Choosing ribbon makes an elegant, decorative addition to your gift wrapping. Choose a ribbon that contrasts or complements your tissue paper. Wrap the ribbon tightly, but not too tightly, around your gift to prevent wrinkling or tearing the paper. Tie a tight, symmetrical bow at the top or side of your gift for a professional finish.
Perfect finishing and final check
After securing, it's important to give your gift a critical once-over. Check that all edges are neatly finished, there are no loose ends, and that the tape or ribbon is securely and invisibly attached. Use your fingers to gently run the ribbon along the edges and smooth out any minor imperfections. A perfectly wrapped gift feels smooth and looks neat and attractive, as if it were professionally wrapped.
Step 6: Check the packaging and add a card if necessary
The final stage of wrapping is just as important as all the preceding steps. A careful final inspection and a personal message can make the difference between a standard gift and an unforgettable one.
Critical final inspection of your packaging
Examine your wrapped gift closely. Check each side to ensure the tissue paper is tightly wrapped around the gift, with no wrinkles or loose edges. Pay attention to the corners and creases—these determine the overall look of your gift. Use your fingertips to apply gentle pressure and smooth out any minor imperfections. Learn more about creating personalized gift wrapping for more inspiration.
Also, check that your tape or ribbon is well-hidden and unobtrusive. The goal is a seamless, elegant finish that draws attention to the beautiful tissue paper, not the fastening method. You can correct any minor imperfections by carefully adding additional tissue paper or decorative elements.
The personal touch with a card
A handwritten card significantly enhances the emotional value of your gift. Choose a card that complements the style and color of your packaging, or use a neutral one that won't detract from the elegance of the tissue paper. Write your message with a beautiful pen and ensure your handwriting is clear and neat. Pay attention to placement: the card should complement the packaging without overwhelming it.
Attach the card with a subtle adhesive strip or carefully tuck it under a ribbon or bow. The recipient will certainly appreciate the extra effort you've made to personally and carefully package the gift.
Discover the convenience of professional wrapping at Kadopapier.net
Do you dream of a stylishly wrapped gift but constantly encounter practical challenges? The article already explained the importance of gathering the right materials, measuring carefully, and working with precision when wrapping with tissue paper. Many people find they just don't achieve that desired luxurious result due to a lack of special packaging materials or inspiration for a beautiful finish. It's frustrating when you put time and attention into a gift, only to have the final result lack that professional touch.
Stop searching and get everything you need in one place. At Kadopapier.net, you'll find not only high-quality tissue paper and sleek ribbon, but also unique gift bags, decorative accessories, and practical tips for every wrapping project. Want to wrap your next gift even more creatively and stress-free? Visit Kadopapier.net and discover our extensive collection of packaging materials that will make your gift truly impress. Choose quality and convenience now so your gift surprises every recipient with eye-catching packaging.
Frequently Asked Questions
How much tissue paper do I need to wrap a gift?
It's recommended to leave about 5 centimeters of extra space on each side of your gift. This allows you to fold the corners neatly without making the paper too tight or too loose.
What are the best techniques for folding tissue paper?
Start by lifting the bottom edge and creating sharp, straight folds. Use tape to hold the folds in place without making them visible. Patience is essential for irregular shapes; consider multiple layers for a smooth finish.
How can I ensure my gift is nicely wrapped?
Make sure your tissue paper is smooth and free of wrinkles before you begin. Also, check the position of the gift and use invisible tape for a neat look. A handwritten note can add a personal touch.
Which accessories can help with wrapping with tissue paper?
Decorative accessories like ribbons and bows are excellent additions that make your gift even more special. Make sure these elements complement the style and color of your tissue paper for a cohesive presentation.