DIY Gift Wrapping: Complete Guide
Creating your own gift wrapping not only adds a personal touch to your gift, but research also shows that more than 60 percent of recipients appreciate handmade packaging . Finding the right materials and details can sometimes take time. Yet, your own creativity ensures that every gift is presented uniquely. Discover practical tips and clever suggestions in this step-by-step guide to make your gifts even more impressive.
Contents
- Step 1: Gather suitable materials and tools
- Step 2: Selecting the right size and design
- Step 3: Creating a solid base for the packaging
- Step 4: Adding Personal Decorations and Details
- Step 5: Checking the strength and finish
Short Summary
| Important Point | Explanation |
|---|---|
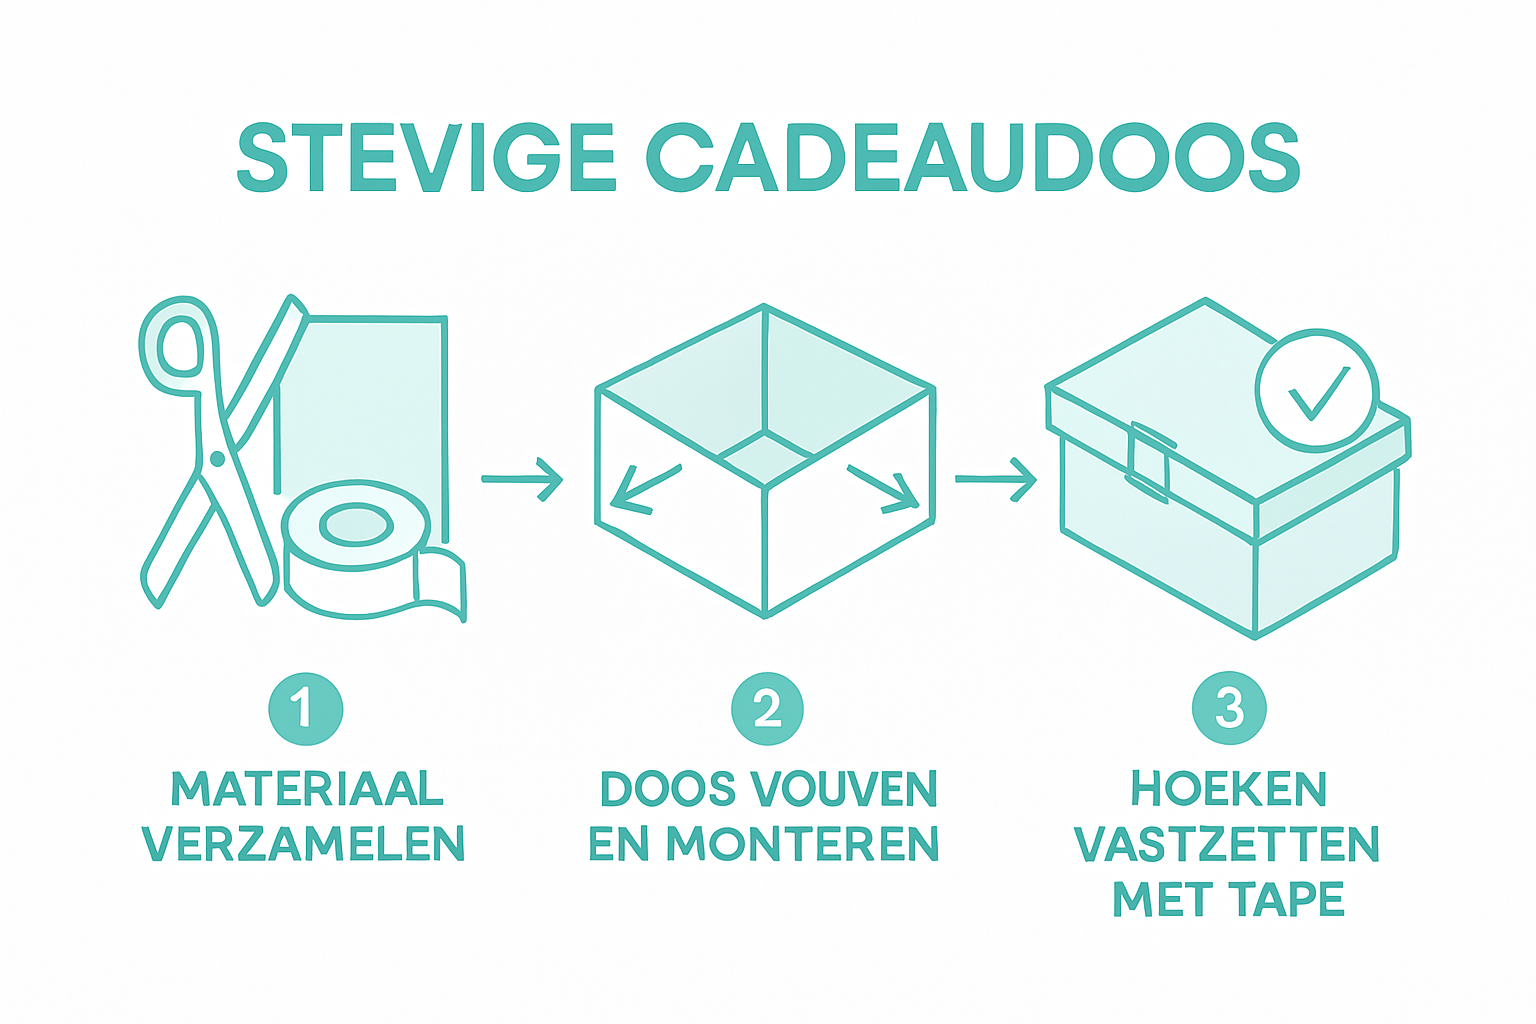
| 1. Gather suitable materials | Wrapping paper, gift bags, and decorations are essential for getting creative. Provide a diverse assortment to create variety. |
| 2. Choose the right size and design | Measure your gift and select packaging that presents it well. Consider the occasion and recipient when designing your gift. |
| 3. Create a solid foundation | Use sturdy materials like kraft paper and ensure accurate measurements. This ensures a professional look. |
| 4. Add personal decorations | Customize decorations to suit the recipient and the occasion. A balance between the central element and the details makes the packaging unique. |
| 5. Check the strength and finish | Inspect the packaging for fold lines and edges. Secure any loose pieces and ensure a smooth finish for optimal presentation. |
Step 1: Gather suitable materials and tools
Creating DIY gift wrapping starts with gathering the right materials and tools. A well-prepared workspace is key to a successful wrapping project. You'll need a diverse range of materials to unleash your creativity.
Start by gathering basic materials like different types of wrapping paper and gift bags . Make sure you have a variety of paper types: glossy, matte, patterned, or plain. Also choose decorative elements like curling ribbon, bows, and tags to give your gift wrapping a personal touch. To tailor your materials to your exact specifications, it's essential to have a few tools on hand.
For cutting and slicing materials, a few basic tools are essential. Make sure you have a sharp utility knife and several types of handsaws to help you precisely cut your packaging materials to size. Other helpful tools include sharp scissors, a cutting mat, a ruler, and double-sided tape. Once you've gathered this basic equipment, you're ready to create your first DIY gift wrap.
Pro tip: Keep your materials neat and organized in separate drawers or boxes to keep them clean and undamaged.
In the next step, we'll delve deeper into actually designing your unique gift packaging.
Step 2: Selecting the right size and design
Choosing the right size and design for your gift wrapping is crucial for presenting your gift perfectly. In this step, you'll determine the dimensions and design that best suit the gift you want to wrap.
Start by measuring your gift and then allow a few centimeters for wrapping material. Consider DIY gift boxes with multiple compartments that offer flexible sizes and layouts. It's wise to choose boxes that are slightly larger than your gift but not too large.
When selecting a design, the occasion and recipient play an important role. Pastel-colored gift boxes with ribbon, for example, can be perfect for gentle surprises like baby showers or weddings. Pay attention to details like color accents and decorative elements that complement the spirit of your gift.
Pro tip: Choose a packaging design that reflects the recipient's personality for an extra personal touch.
In the next step, we'll look at exactly how to prepare the materials for packing.
Step 3: Creating a solid base for the packaging
A solid base is essential for professional-looking gift wrapping. In this step, we'll cover the fundamental techniques for creating a solid and attractive base for your gift wrapping.
First, choose a sturdy base material that suits your gift. Kraft paper is an excellent option for durable and robust packaging , as it's both sturdy and flexible. When choosing your material, consider the size and weight of the gift. A small jewelry box requires a different base than a large book or electrical appliance.
Start by smoothing your base material to prevent wrinkles. Use a sturdy surface like a cutting mat and ensure you have plenty of room to work. Measure your material accurately, leaving a few centimeters on each side for the folded edges. Trim or cut the material with a sharp tool to prevent frayed edges and ensure a clean finish.
Pro tip: Always test your folding technique on a spare piece of paper first to achieve perfection.
In the next step, we'll look at how to precisely fold and secure your packaging material.
Step 4: Adding Personal Decorations and Details
Personalized decorations make your gift wrapping unique and a surprise for the recipient. In this step, we'll explore various techniques to transform your gift wrapping into a true work of art full of personal touches.
On websites like CC Hobby, you'll find a wide variety of decorative materials like curling ribbon, gift tags, and stickers to enhance your packaging. Choose decorations that reflect the recipient's personality or the special occasion. Think sparkly ribbons for weddings, cheerful stickers for children's birthdays, or sleek metallic accents for corporate gifts.
When adding decorations, balance is key. Start with a central decorative element like a pretty bow or a handmade tag. Then combine smaller details like mini stickers or subtle glitter accents. Experiment with different textures and materials to create depth and interest. For example, kraft paper packaging can be brightened up with a silk ribbon or a vintage label.
Pro tip: Look at the overall color scheme and make sure your decorations harmonize with the base material.
In the next step, we'll look at the finishing touches to your unique gift wrapping.
Step 5: Checking the strength and finish
After all the creative effort, it's crucial to thoroughly inspect your gift wrapping. In this phase, we'll carefully assess the sturdiness and finish of your packaging to ensure a professional final result.
As several manuals emphasize, careful final inspection is essential for a successful project. Start by checking the fold lines and edges. Make sure all the adhesive edges are neat and smooth, without any bumps or wrinkles. Carefully fold the edges and check that they are even and symmetrical.
Pay particular attention to the corners and joints of your packaging. These should be sturdy and smooth, with no protruding edges or loose pieces. If necessary, use an extra dab of glue to reinforce weak spots. Also, check the decorative elements to ensure they are securely fastened and won't come loose during transport.
Pro tip: Carefully turn the packaging over and look at it from different angles to check for any imperfections.
In the next step, we'll add the finishing touches to truly complete your gift wrapping.
Make your DIY gift wrapping unforgettable with the best materials
Making your own gift wrapping requires the right materials and a creative approach. As described in the guide, gathering sturdy materials, carefully selecting the size, and adding personalized details are essential for a successful result. However, finding high-quality, beautiful products that offer exactly the support you need at every step of the process can be challenging.
At Kadopapier.net, you'll find everything you need to bring your creative gift wrapping to life. From versatile wrapping paper in various designs and sturdy kraft paper rolls to elegant ribbons and graceful bows, we offer durable and user-friendly materials that make your packaging sturdy while giving it a personal touch. Start creating your unique packaging masterpiece today and experience the joy of a professional result. Discover how easy it is to perfect your DIY gift wrapping with our extensive collection at Kadopapier.net .
Frequently Asked Questions
What do I need to make my own gift wrapping?
You'll need basic materials like wrapping paper, gift bags, and decorative elements. Make sure you also have tools like a sharp utility knife, scissors, and double-sided tape on hand.
How do I choose the right size for my gift wrapping?
First, measure your gift and add a few extra centimeters for wrapping material. Choose a box that's slightly larger than your gift, but not too large, to ensure a neat presentation.
What are some good tips for decorating my gift wrapping?
Choose decorations that suit the occasion and the recipient. Start with a central decoration, such as a pretty bow, and add smaller details to create balance and interest.
How do I check the strength of my gift wrapping?
Check all fold lines and adhesive edges to ensure they are neat and clean. Pay particular attention to the corners; use additional adhesive if necessary to reinforce weak points.
How do I create a sturdy base for my gift wrapping?
Choose a sturdy base material, such as kraft paper, and measure it accurately. Make sure you have enough space to work with and cut the material with a sharp tool to prevent frayed edges.
What are some finishing tips for my gift wrapping?
Check that the edges are even and symmetrical, and pay attention to the decorative elements to ensure they are securely attached. Carefully turn the packaging over and examine it from different angles to identify any imperfections.
Recommendation
- Kadopapier.net | Wholesale Gift Wrapping Paper, Bags, and Tissue Paper
- Choose gift bags or boxes for every occasion – Kadopapier.net
- Wrapping without wrapping paper: Creative and Sustainable – Kadopapier.net
- Wrapping with tissue paper: Wrap your gifts in style – Kadopapier.net
- Eco-Friendly Gifts for Children: Inspire Nature Connection – The Zoofamily